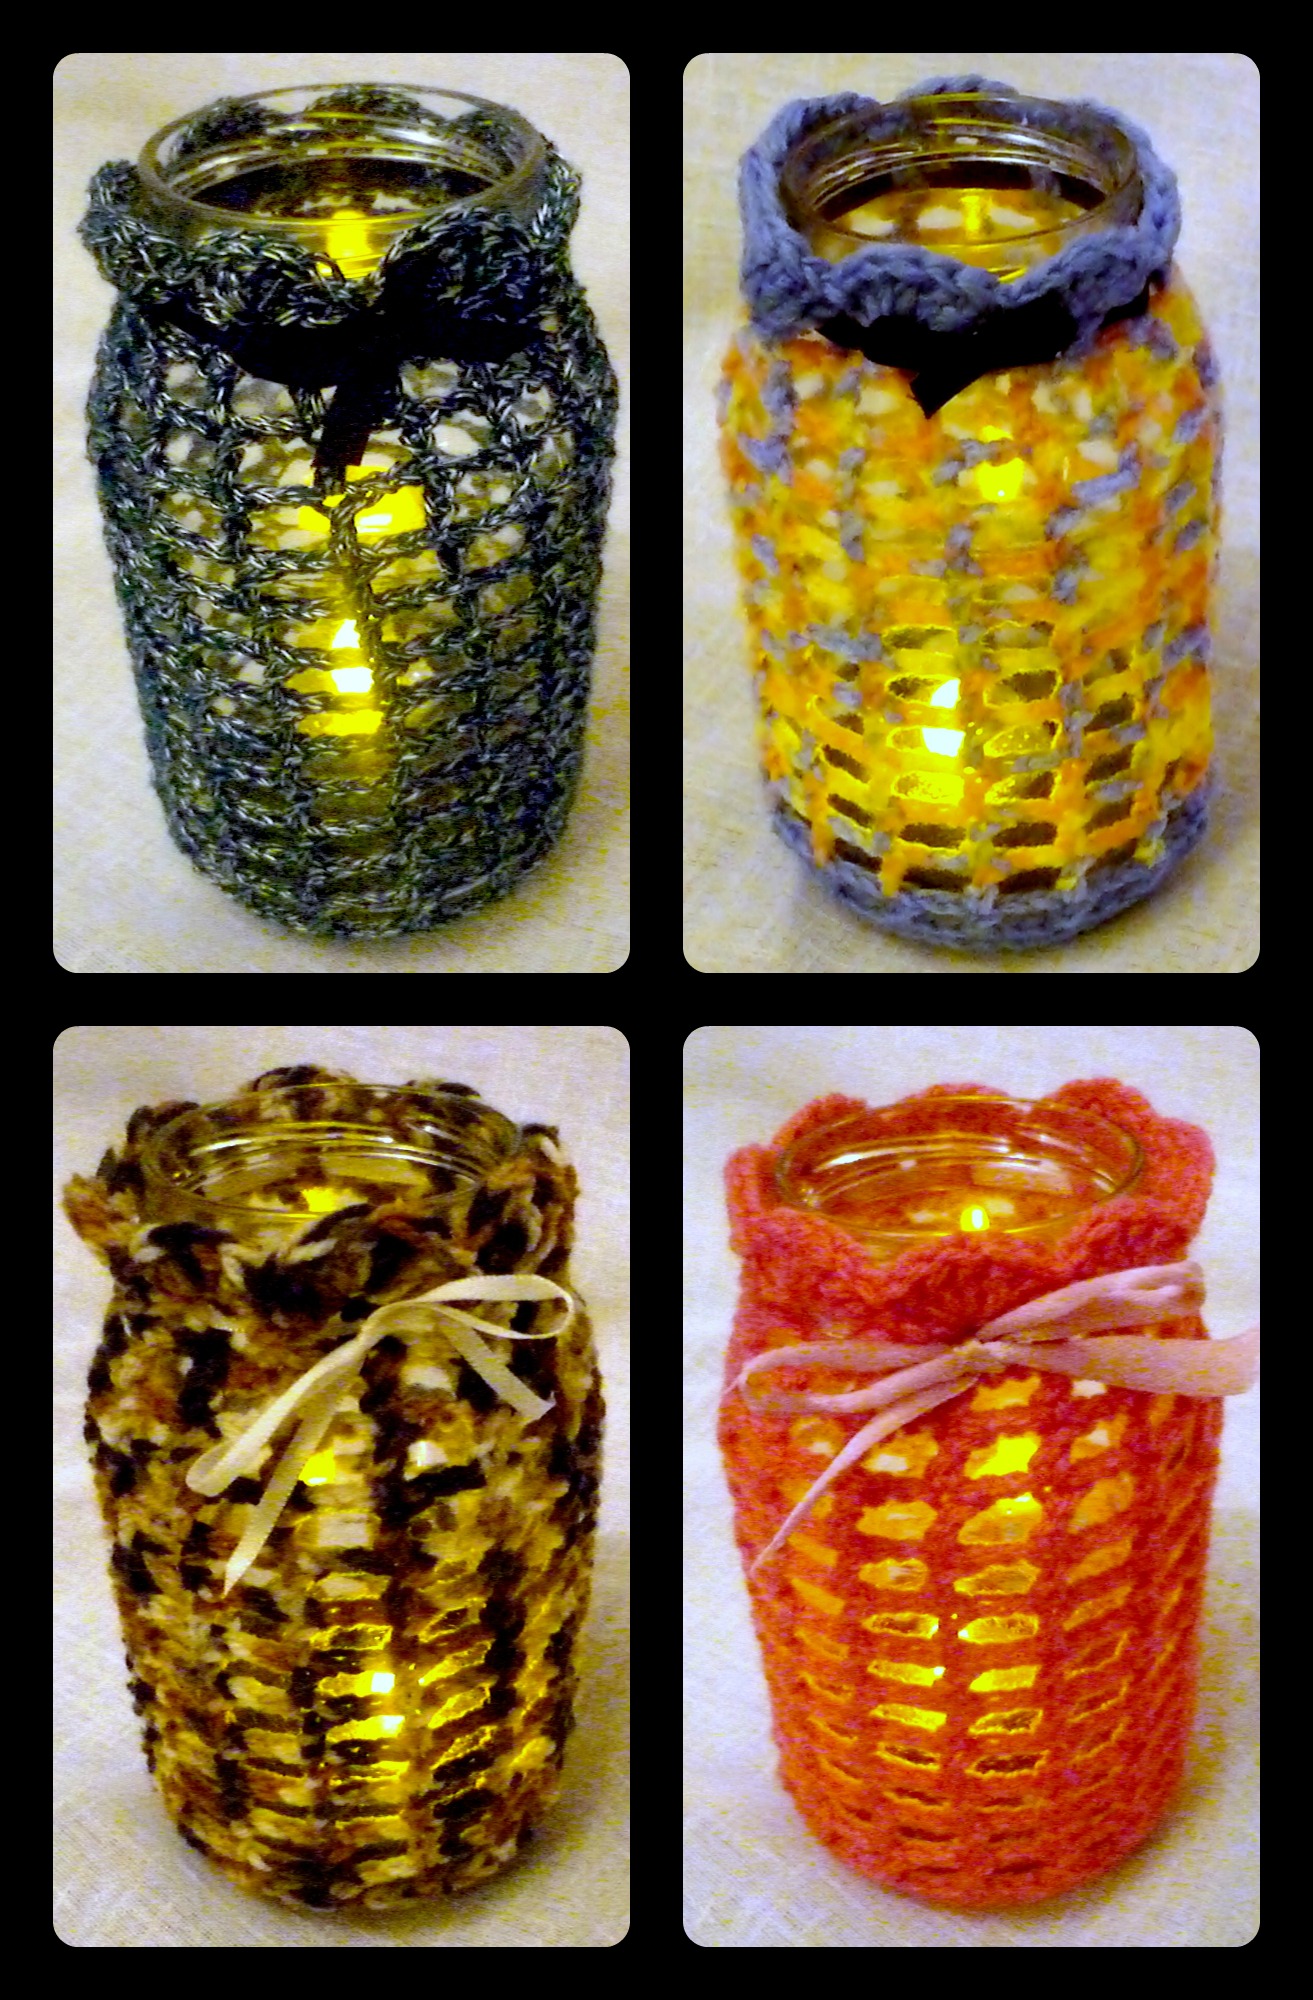
Crochet covers for glass jars to make them decorative. Usable as t-light holders, pencil pots etc.. (I even have one as a container for my crochet hooks!!)
These can be adapted for any size jar with a bit of figuring out!
Yarn: Any…. vary the size of hook and the number of “rounds” depending on the jar size
Hook: depends on the yarn…. again make the pattern work relating to the yarn and jar size.
Jar: I have been using “Supermarket own brand Mayo” jars which are all similar size and shape but the pattern needs to be adjusted for the size of jar.
This pattern uses US stitches but ca be adapted for UK by reading SC as DC and DC as TRC
MC6 (6)
SC2 in each st (12)
SC1, SCincrease (18)
SC2, SCincrease (24)
SC3, SCincrease (30)
SC4, SCincrease (36)
SC5, SCincrease (42)
SC6, SCincrease (48) (VARY the increase rings here to fit the jar as necessary…… the next round would have 54 st in total and then increasing in multiples of 6…. You can also stop before frow 8 if the disc fits the base of your jar.)
SC a row without increase in blo to turn up the sides of the jar
1st row of “holes” CH4, *DC, CH2* repeat *to* around the ring and slst to 2nd ch from beginning “loop”.
Repeat row 10
Repeat row 10
Continue rows of “holes” to the desired height (for the jars I used this was 12 rows of “holes” up to row 22
For the top I made scallops by DC x5 in the first DC from the join, then slst into the top of the next DC and so on around the top of the cover.
This pattern is written using US stitch names. To convert to UK stitch terms read SC (Single Crochet) as DC (Double Crochet) All other parts of the pattern will be the same.
You will need
Yarn: Arran weight (I use any brand. Colour-wise I use cream for Caucasian skin but obviously the colour can be varied depending on the skin colour of the person to be made.)
Hook size: 4mm
Stuffing: Any type of stuffing will work. I have used all sorts from hollow fibre toy-stuffing to rags and cut up fabric. The mini-mes I make tend to be fairly rigid and I am currently using woolen blankets cut up for stuffing but fleece fabric and old jumpers work just as well. You will need some fabric to cover the wiring to prevent it poking through the hands and feet.
Wire: Any type of craft-style wire will work. I use stripped down copper electrical wire as I find this more cost-effective than purpose sold crafting wire. Your wire needs to be fairly thick (2.5mm² CSA is ideal).
Additional notes: Unless otherwise stated repeat each set of instructions around the ring until you have the required number of stitches. When decreasing (SC2tog) it looks neater if you SC in flo each time. (invisible decrease)
Head (Stuff as you go)
Row:
MC6 (Magic Circle/Magic Ring) (6)
2SC in each st. (12)
SC1, 2SC in same st (Increase) (18)
SC2, 2SC increase (24)
SC3, 2SC increase (30)
SC4, 2SC increase (36)
SC in each st around (36)
SC in each st around (36)
SC in each st around (36)
SC4, SC2tog (flo) (30)
SC3, SC2tog (flo) (24)
SC2, SC2tog (flo) (18)
SC1, SC2tog (flo) (12)
SC2tog (flo) (6)
Fasten off
Body Stuff as you go
MC10 (10)
2SC in each st. (20)
SC1, 2SC increase (30)
SC in each st. (30)
SC in each st. (30)
SC in each st. (30)
SC3 SC2tog (24)
SC in each st. (24)
SC in each st. (24)
SC in each st. (24)
SC3, SC2tog (20)
SC in each st. (20)
SC in each st. (20)
SC in each st. (20)
SC2 SC2tog (15)
SC in each st. (15)
SC in each st. (15)
SC in each st. (15)
SC1, SC2tog (10)
SC3tog, SC2, SC3tog, SC2 (6)
Fasten off.
Arms Make 2
MC6 (6)
SC2, SC2 increase (9)
SC in each st. (9)
SC in each st. (9) Stuff hand
SC1, SC2tog (6)
SC in each st. (6)
SC in each st. (6)
SC in each st. (6)
SC in each st. (6)
SC in each st. (6)
SC in each st. (6)
SC in each st. (6)
SC in each st. (6)
SC in each st. (6)
SC in each st. (6)
SC in each st. (6)
Fasten off
Legs Make 2
Ch4
SC2 in 2nd ch from hook, slst in next ch, slst4 in last ch.
Other side of CH row: slst in next ch, SC2 in next ch, slst into first st to complete first round
SC around increasing at toe (wide end) and heel (narrow end) to make 15 stitches (15)
SC around blo (15)
SC2tog x5 at the front of the foot, SC6 in each st around the heel (this forms the top of the foot) (11)
SC2tog x3 at fron t of foot, SC5 in each st around the heel (8)
SC in each st. (8)
SC in each st. (8)
SC in each st. (8)
SC in each st. (8)
SC in each st. (8)
SC in each st. (8)
SC in each st. (8)
SC in each st. (8)
SC in each st. (8)
SC in each st. (8)
SC in each st. (8)
SC in each st. (8)
SC in each st. (8)
SC in each st. (8)
SC in each st. (8)
SC in each st. (8)
SC in each st. (8)
Fasten off.
Stuff arms and legs by making a wire skeleton/armature. Cut lengths of wire just longer than twice the completed length of the crochet limbs. fold the two cut ends to the centre and twist together.
Wrap these wires in fabric (slightly softer/thicker fabric such as blanket material or micro-fibre fleece works best) bind them up with yarn and then stuff them down into the arms and legs.
Position all the body-parts together and sew securely into a body.
Additional option for a woman…..
Female boobies! x2
MC6 (6)
SC2 SC2inc (9)
SC in each st around (9)
This is the basic body shape I use when making mini-mes, however I adapt the sizing to suit the person (eg. fatter/thinner body shape, longer torso/legs/arms for a taller person etc.)
Once the basic body-shape has been made I am then able to add all the distinguishing features and clothing to replicate the person to be made.
For more information/assistance please get in touch via rachel@pixiecreations.co.uk
Whilst demonstrating tablet weaving at various craft fairs and events I often have interested people wanting to know how tablet weaving works.
Tablet weaving is a method of weaving strong, narrow, decorative braid. Although the equipment required is cheap and simple, there is a vast range of possible patterns. Uses of tablet-woven braid includes the decoration of clothing, and use as belts and straps. Materials used in the past include wool, linen, silk, and gold and silver thread.
Tablet woven braids were made in Europe from the Bronze Age up until medieval times, and they are still made in parts of the world such as Turkey and Pakistan. The art of tablet or card weaving has developed over time to the extent that the designs and patterns have become more and more challenging. Here you can find a picture of someone weaving with 400 cards!!
I was first introduced to tablet weaving through The Vikings re-enactment society when I was a child. My family had connections through the Wychwood Warriors based in and around Oxford.
Vikings used tablet braid widely to decorate fabrics, strengthen hems and seams and as belts, straps and braids as can be seen on the following pictures.
I have made tablet braid using many different methods and over time I have developed a frame and type of tablet that works best for me.
Initially I used old beer mats with holes punched in the corners and tied the warp threads between legs of furniture in my house to keep the tension.
I found the cardboard of the beer-mats wore through very easily and were not authentic. I also needed something more portable. As such I designed and made a frame which I could transport to different events. I also made different types of tablets, plastic ones for use when authenticity was not an issue and wooden tablets to put in place when in an authentic re-enactment setting.
How I set up Tablet Weaving
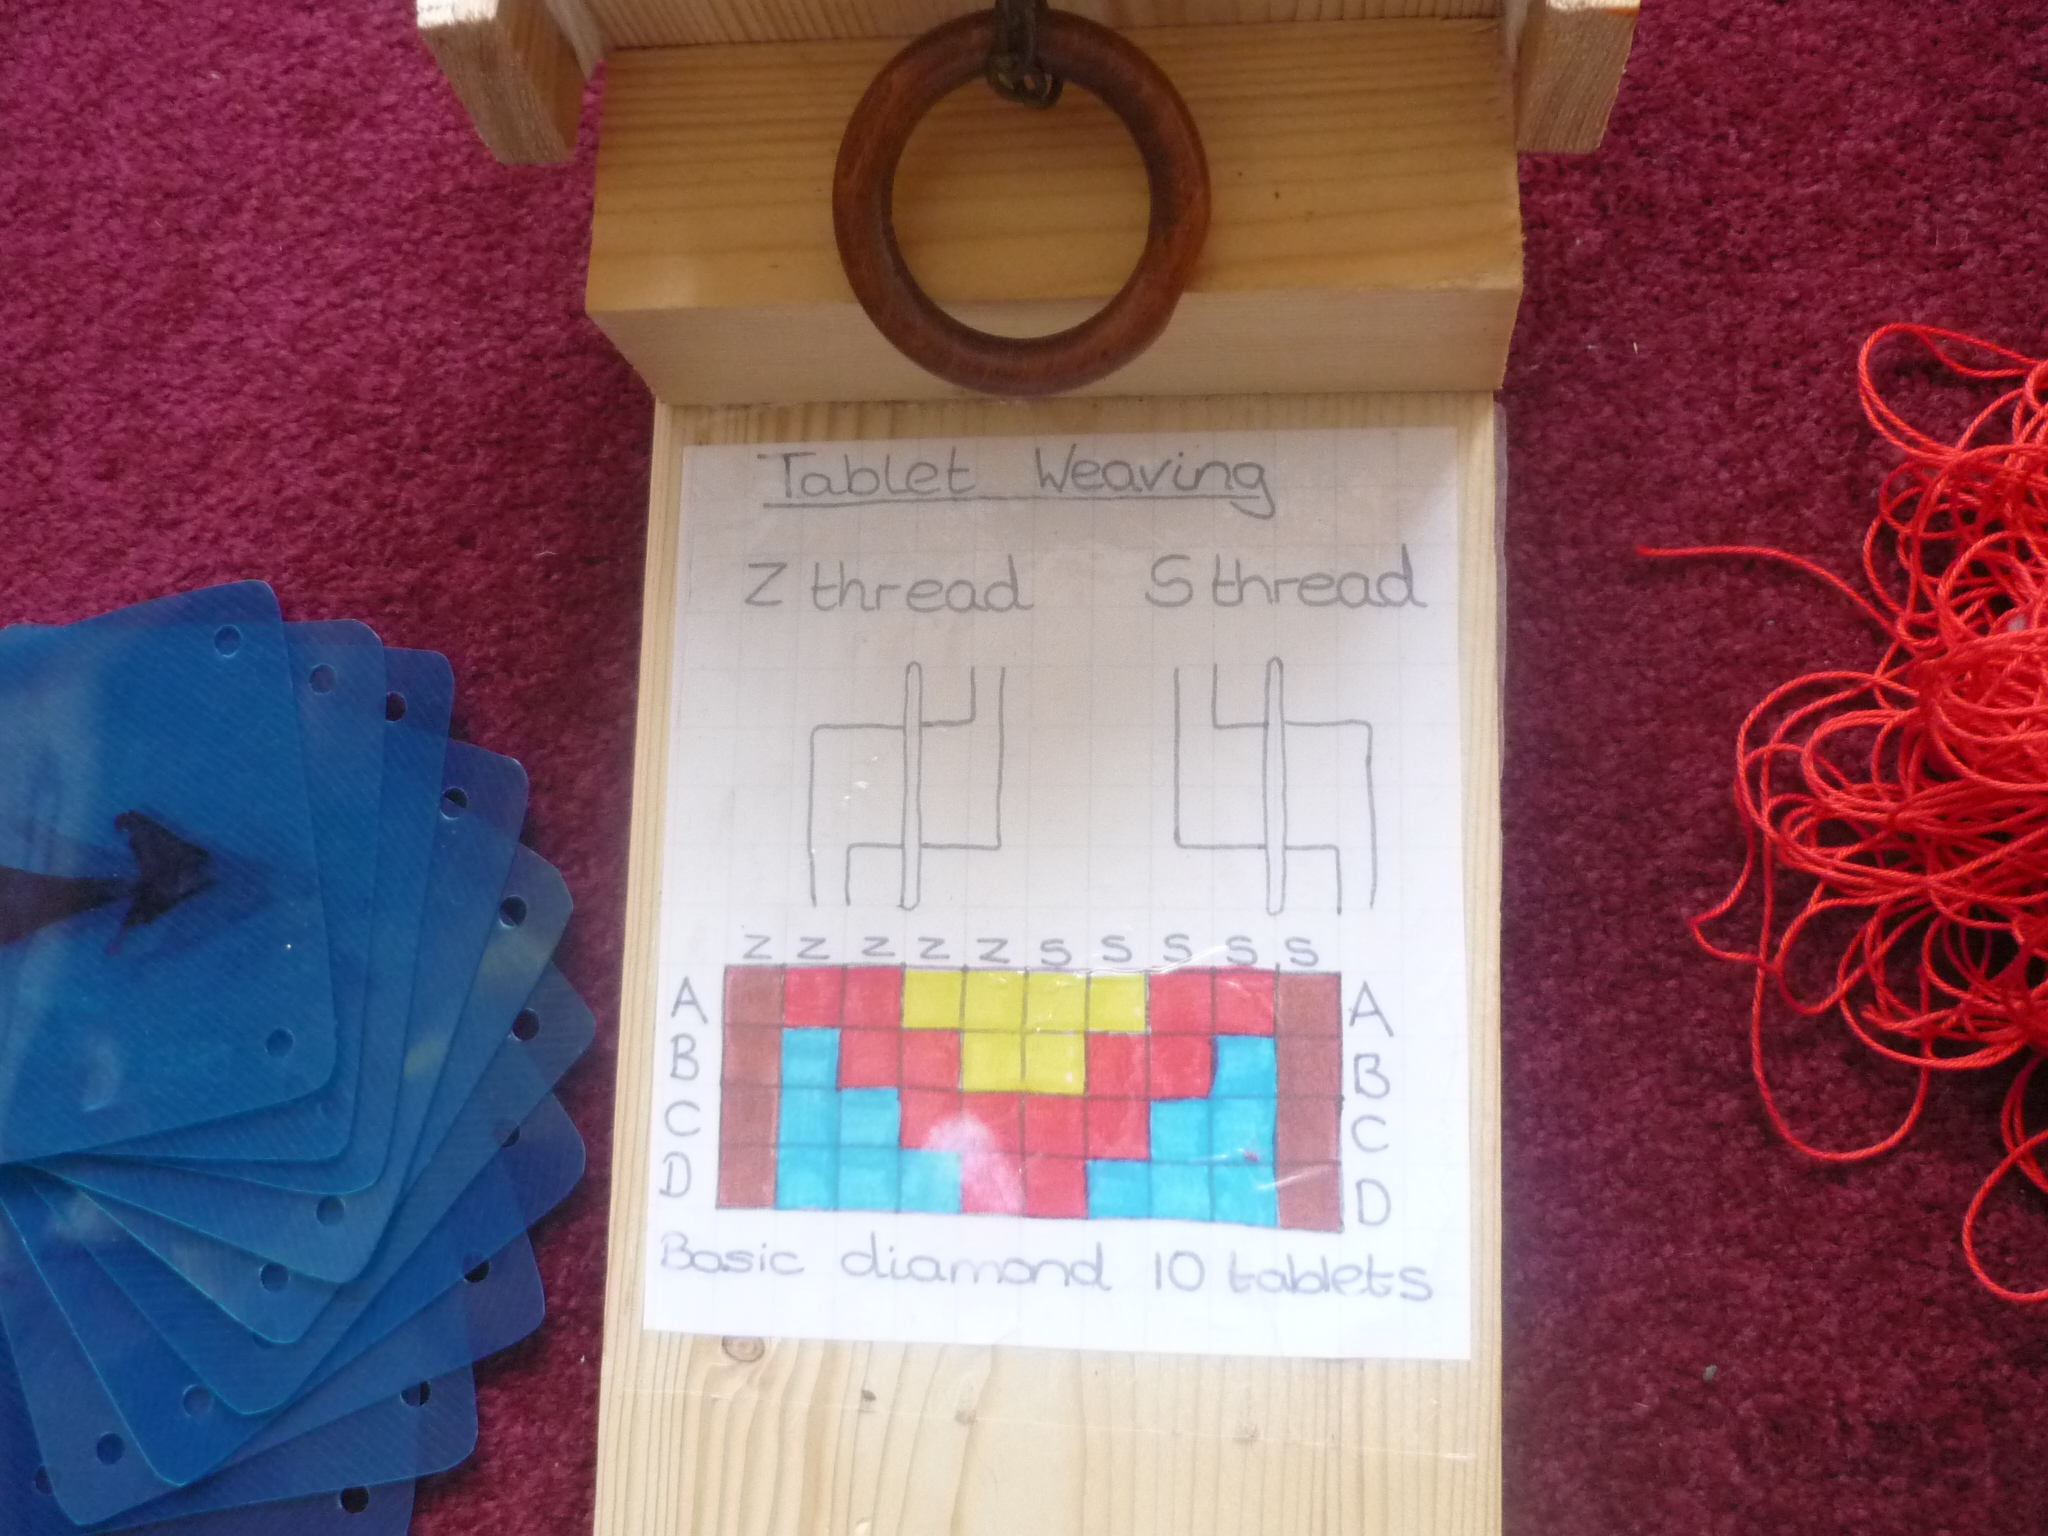
First I draw out the design on squared paper. The simplest and most common design involves chevrons and diamond shapes.
I then use the design to calculate the number of warp threads needed and cut these. I usually use cotton crochet thread as this behaves in a similar way to linen but is more readily available. (I have used 100% wool in the past but this has a tendency to felt in the washing process and thus loose the pattern.)
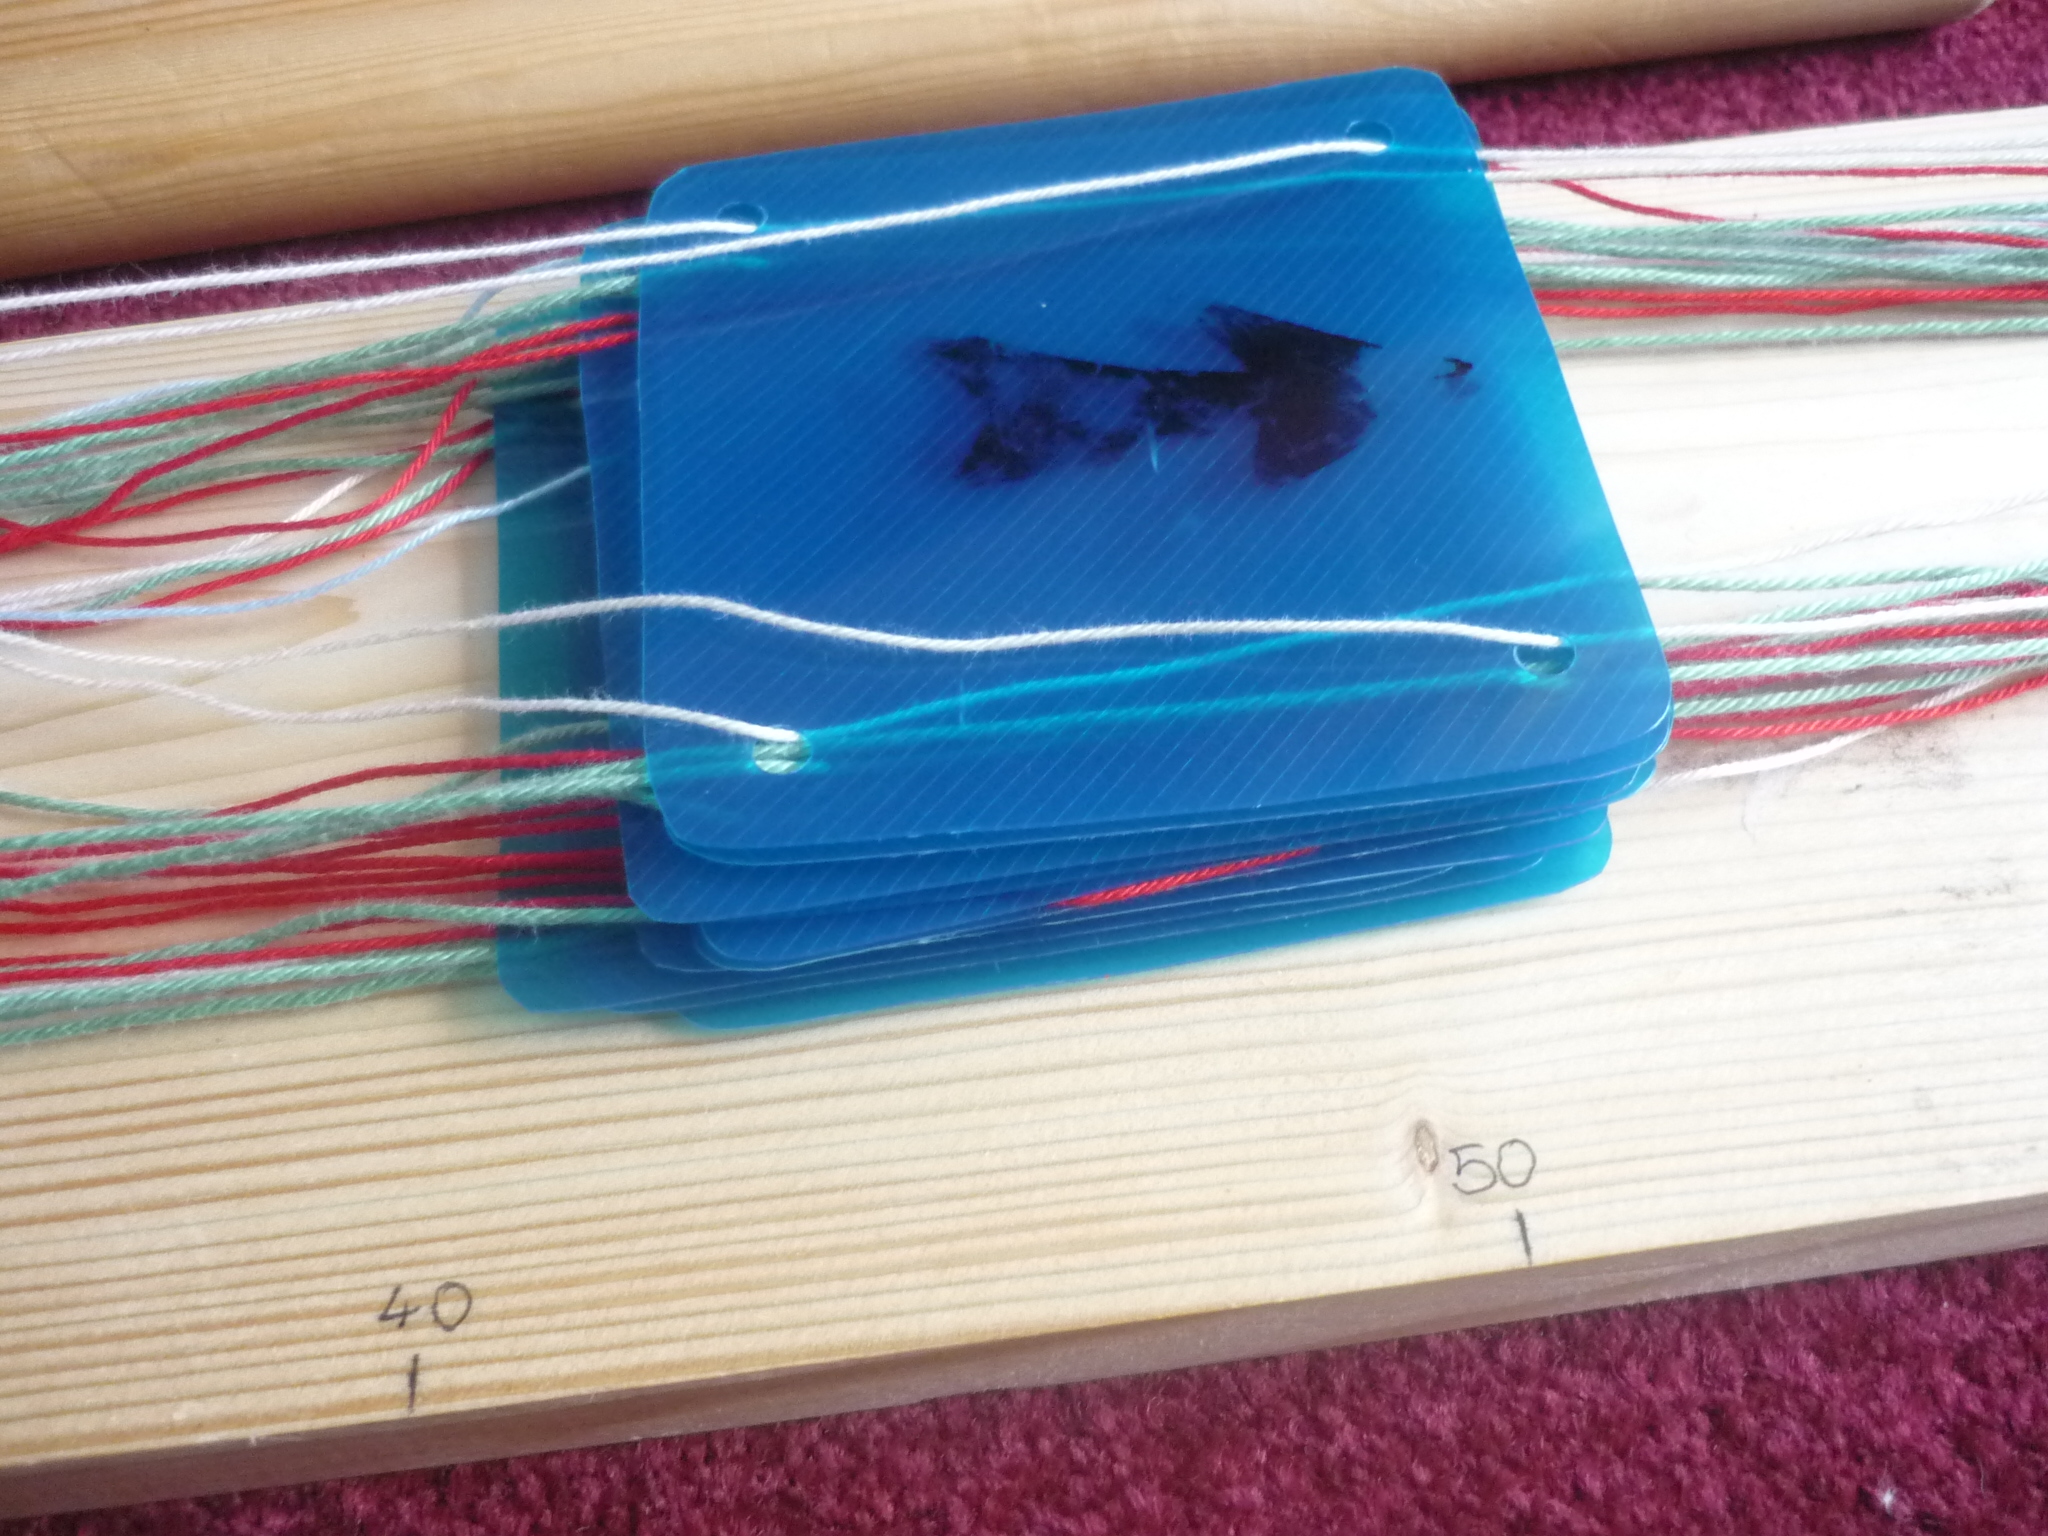
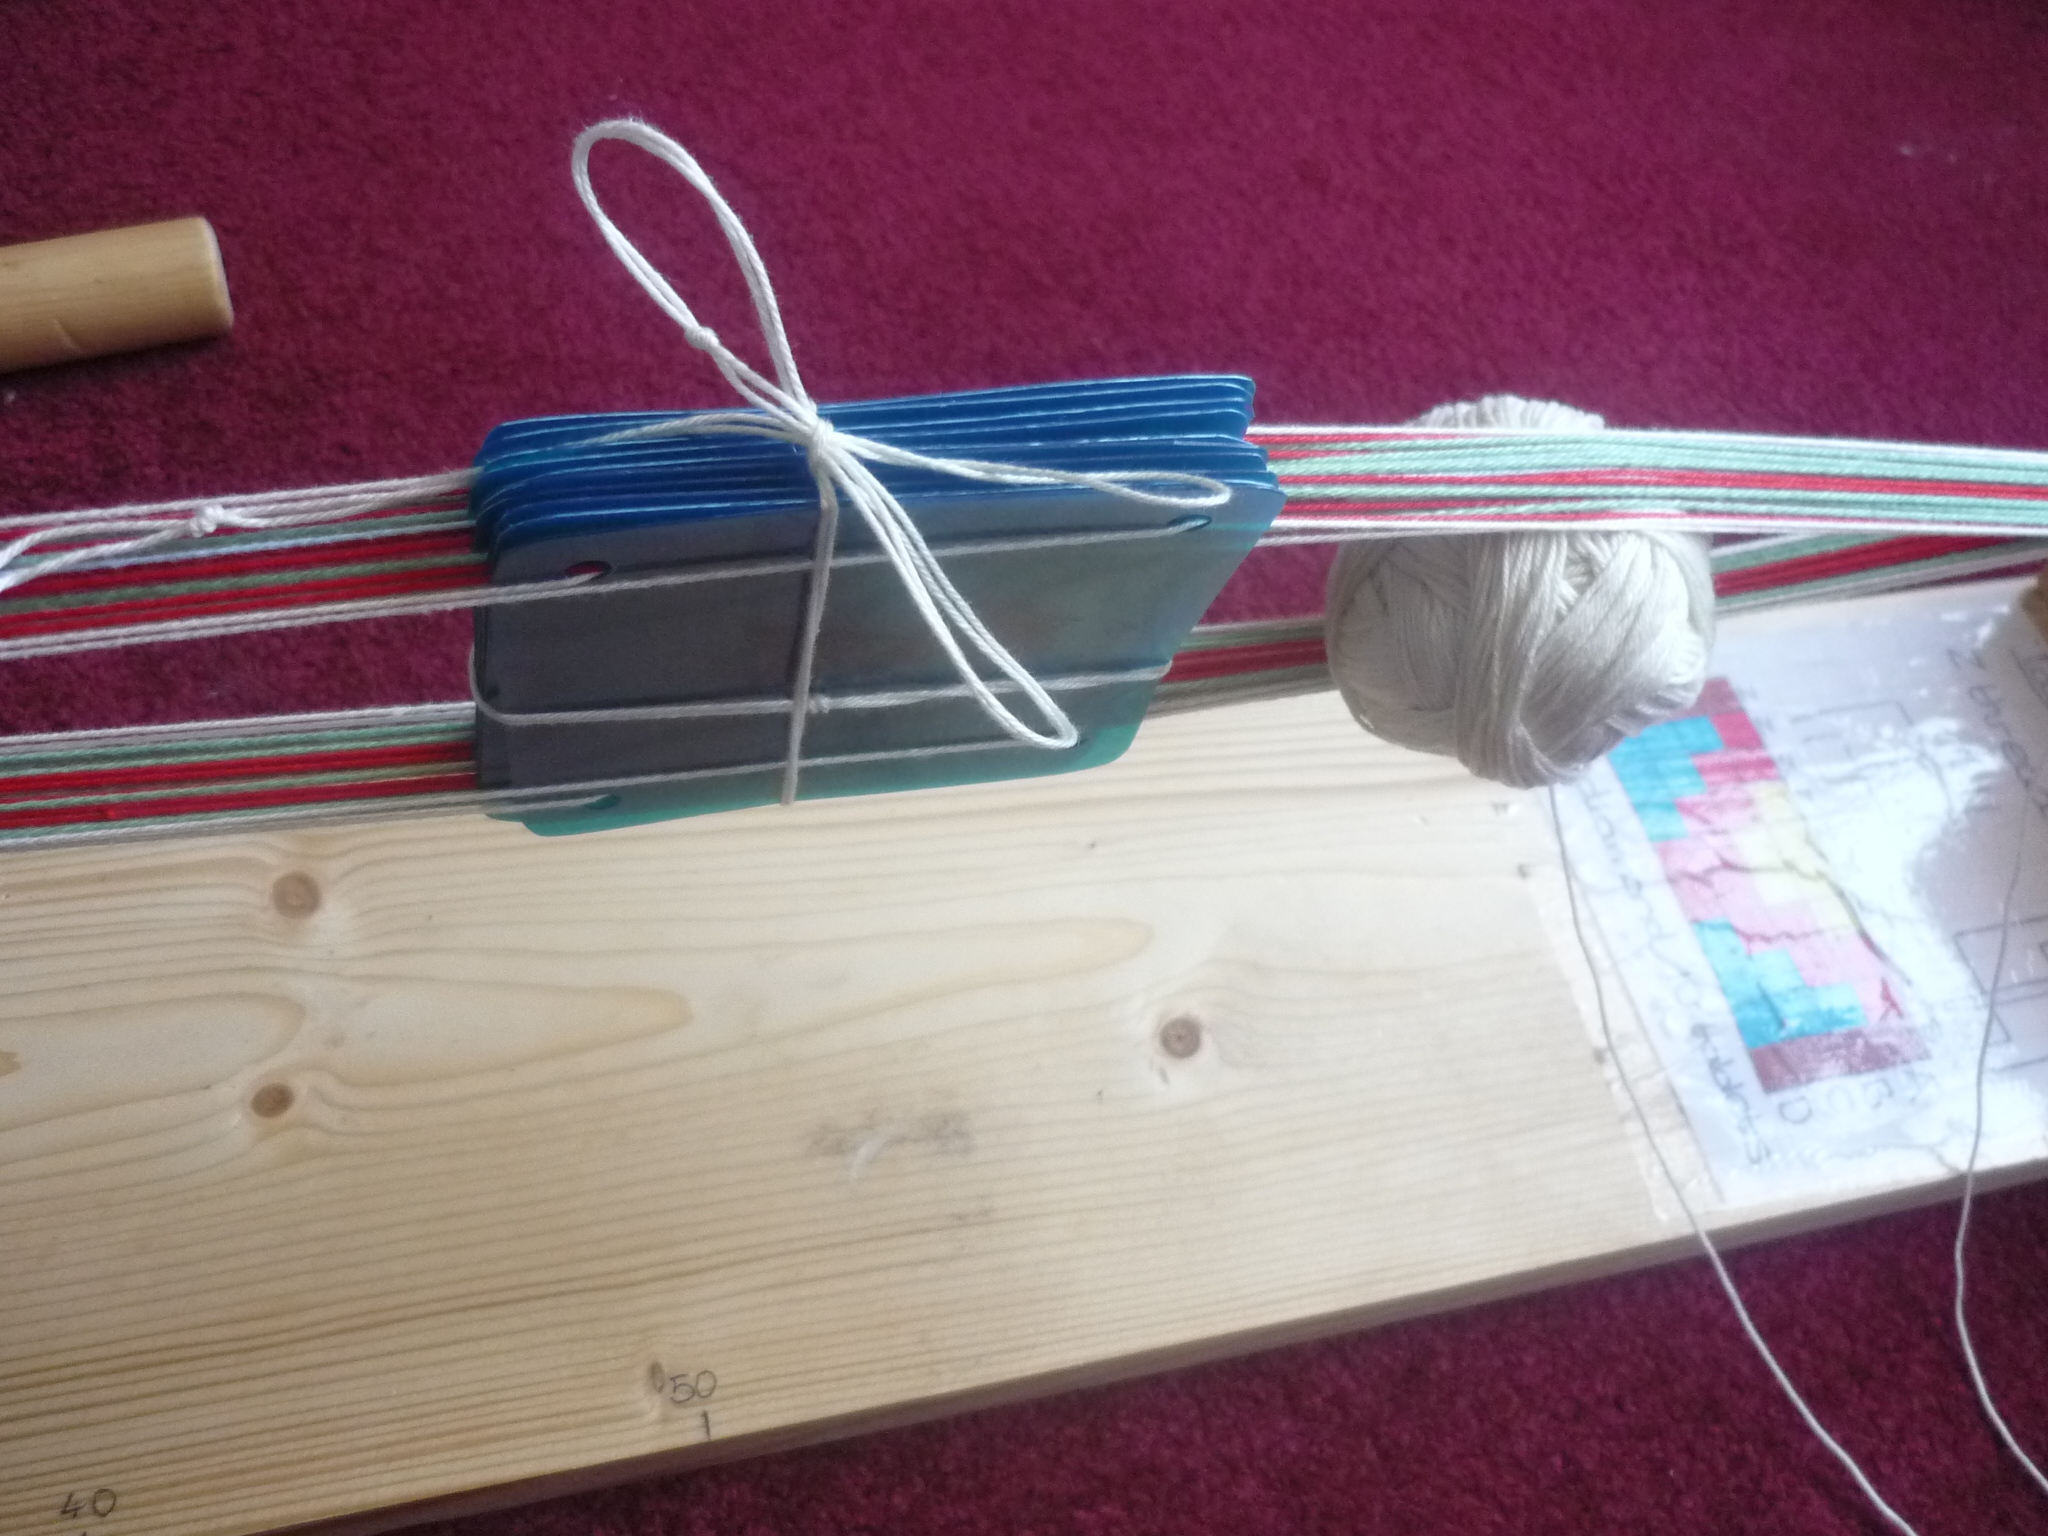
I then gather together all the equipment needed. In the picture below you can see the wooden sections of the frame, the cut threads, the plastic tablets and a ball of weft thread. (The weft thread can be any colour as the pattern is made with the warp threads.
The following image is a close-up of the pattern, this design is a basic red chevron… half a diamond shape with a yellow inside and a blue background. the braid will be edged with a fawn border.
In the design you can see the different ways of threading the tablets, either s-thread or z-thread. This will be explained later.
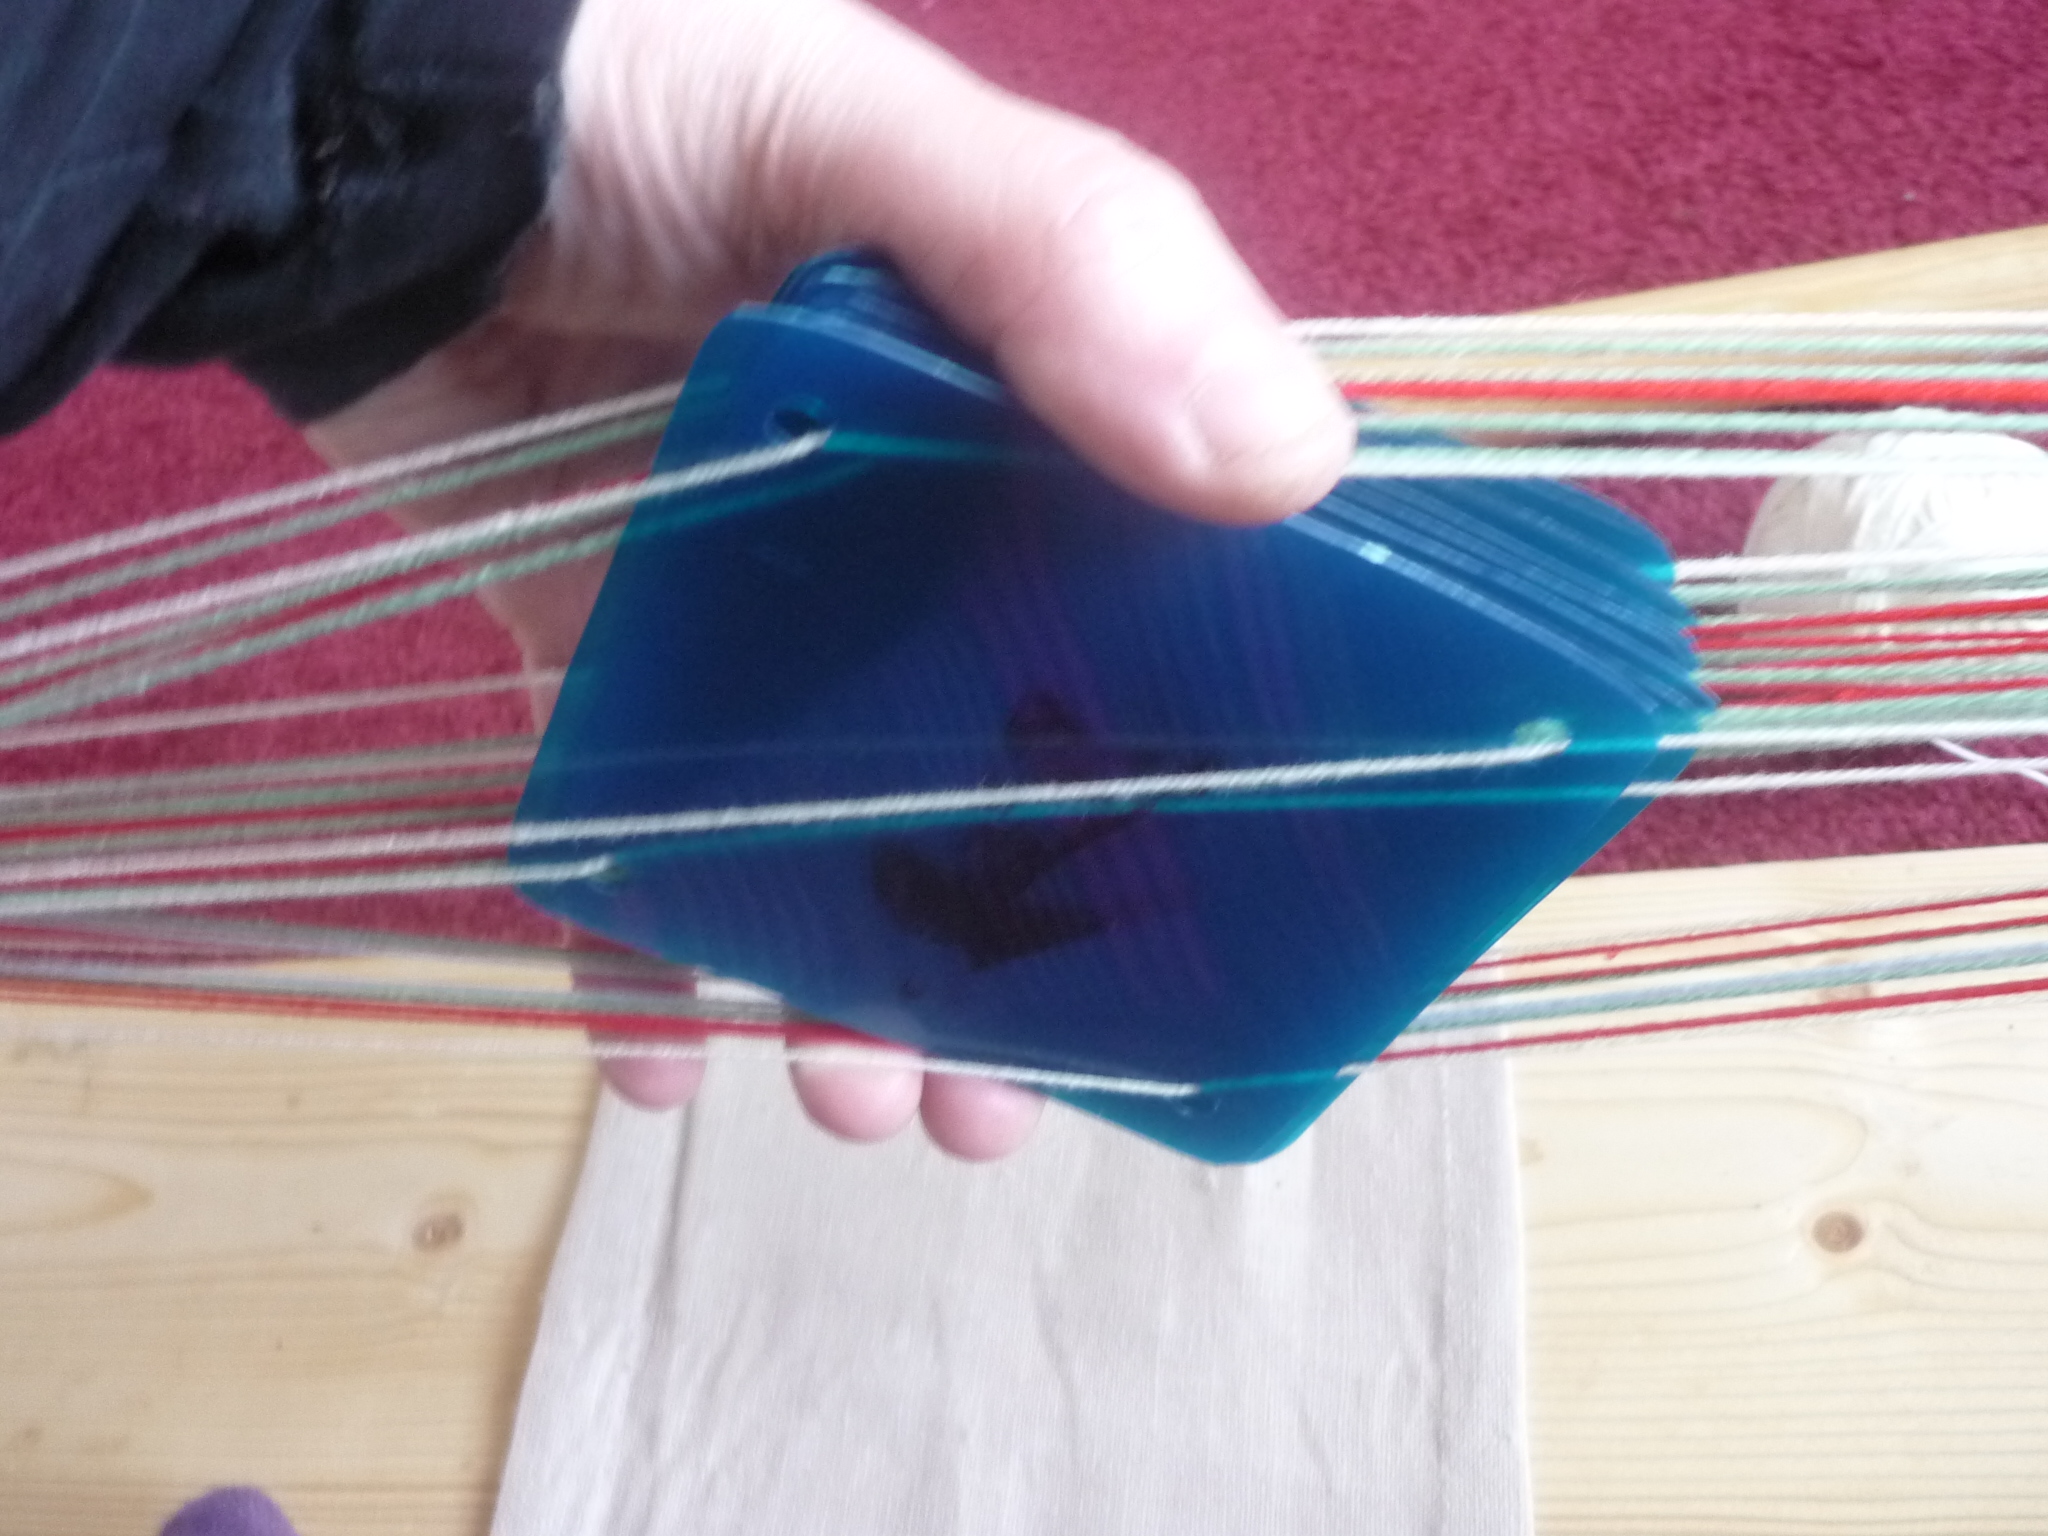
This design needs 10 tablets (the number of columns across) The tablets I generally use have been cut out from sheets of plastic (similar to the type you will find on the cover of plastic display folders) Each tablet has a hole punched in each corner and an arrow drawn on to show start/finish direction (this will help when weaving to keep all the tablets in the correct orientation)
Each tablet corresponds to one of the columns in the design. The holes correspond to the A, B, C, D rows in the design (some people like to write these letters directly onto the tablets.)
For the first tablet each hole needs to be threaded in fawn using a z-thread set-up (meaning the threads come in to each hole from the right and out from the left)
Once all four warps have been threaded in the correct way they are tied securely to the ring at the top of the frame.
I then refer to the diagram for the next tablet (next column across). This tells me that I need one red thread and three blue.
After threading the tablets they are tied onto the ring next to the previous threads. To keep the warp threads organised I stack the tablets in order.
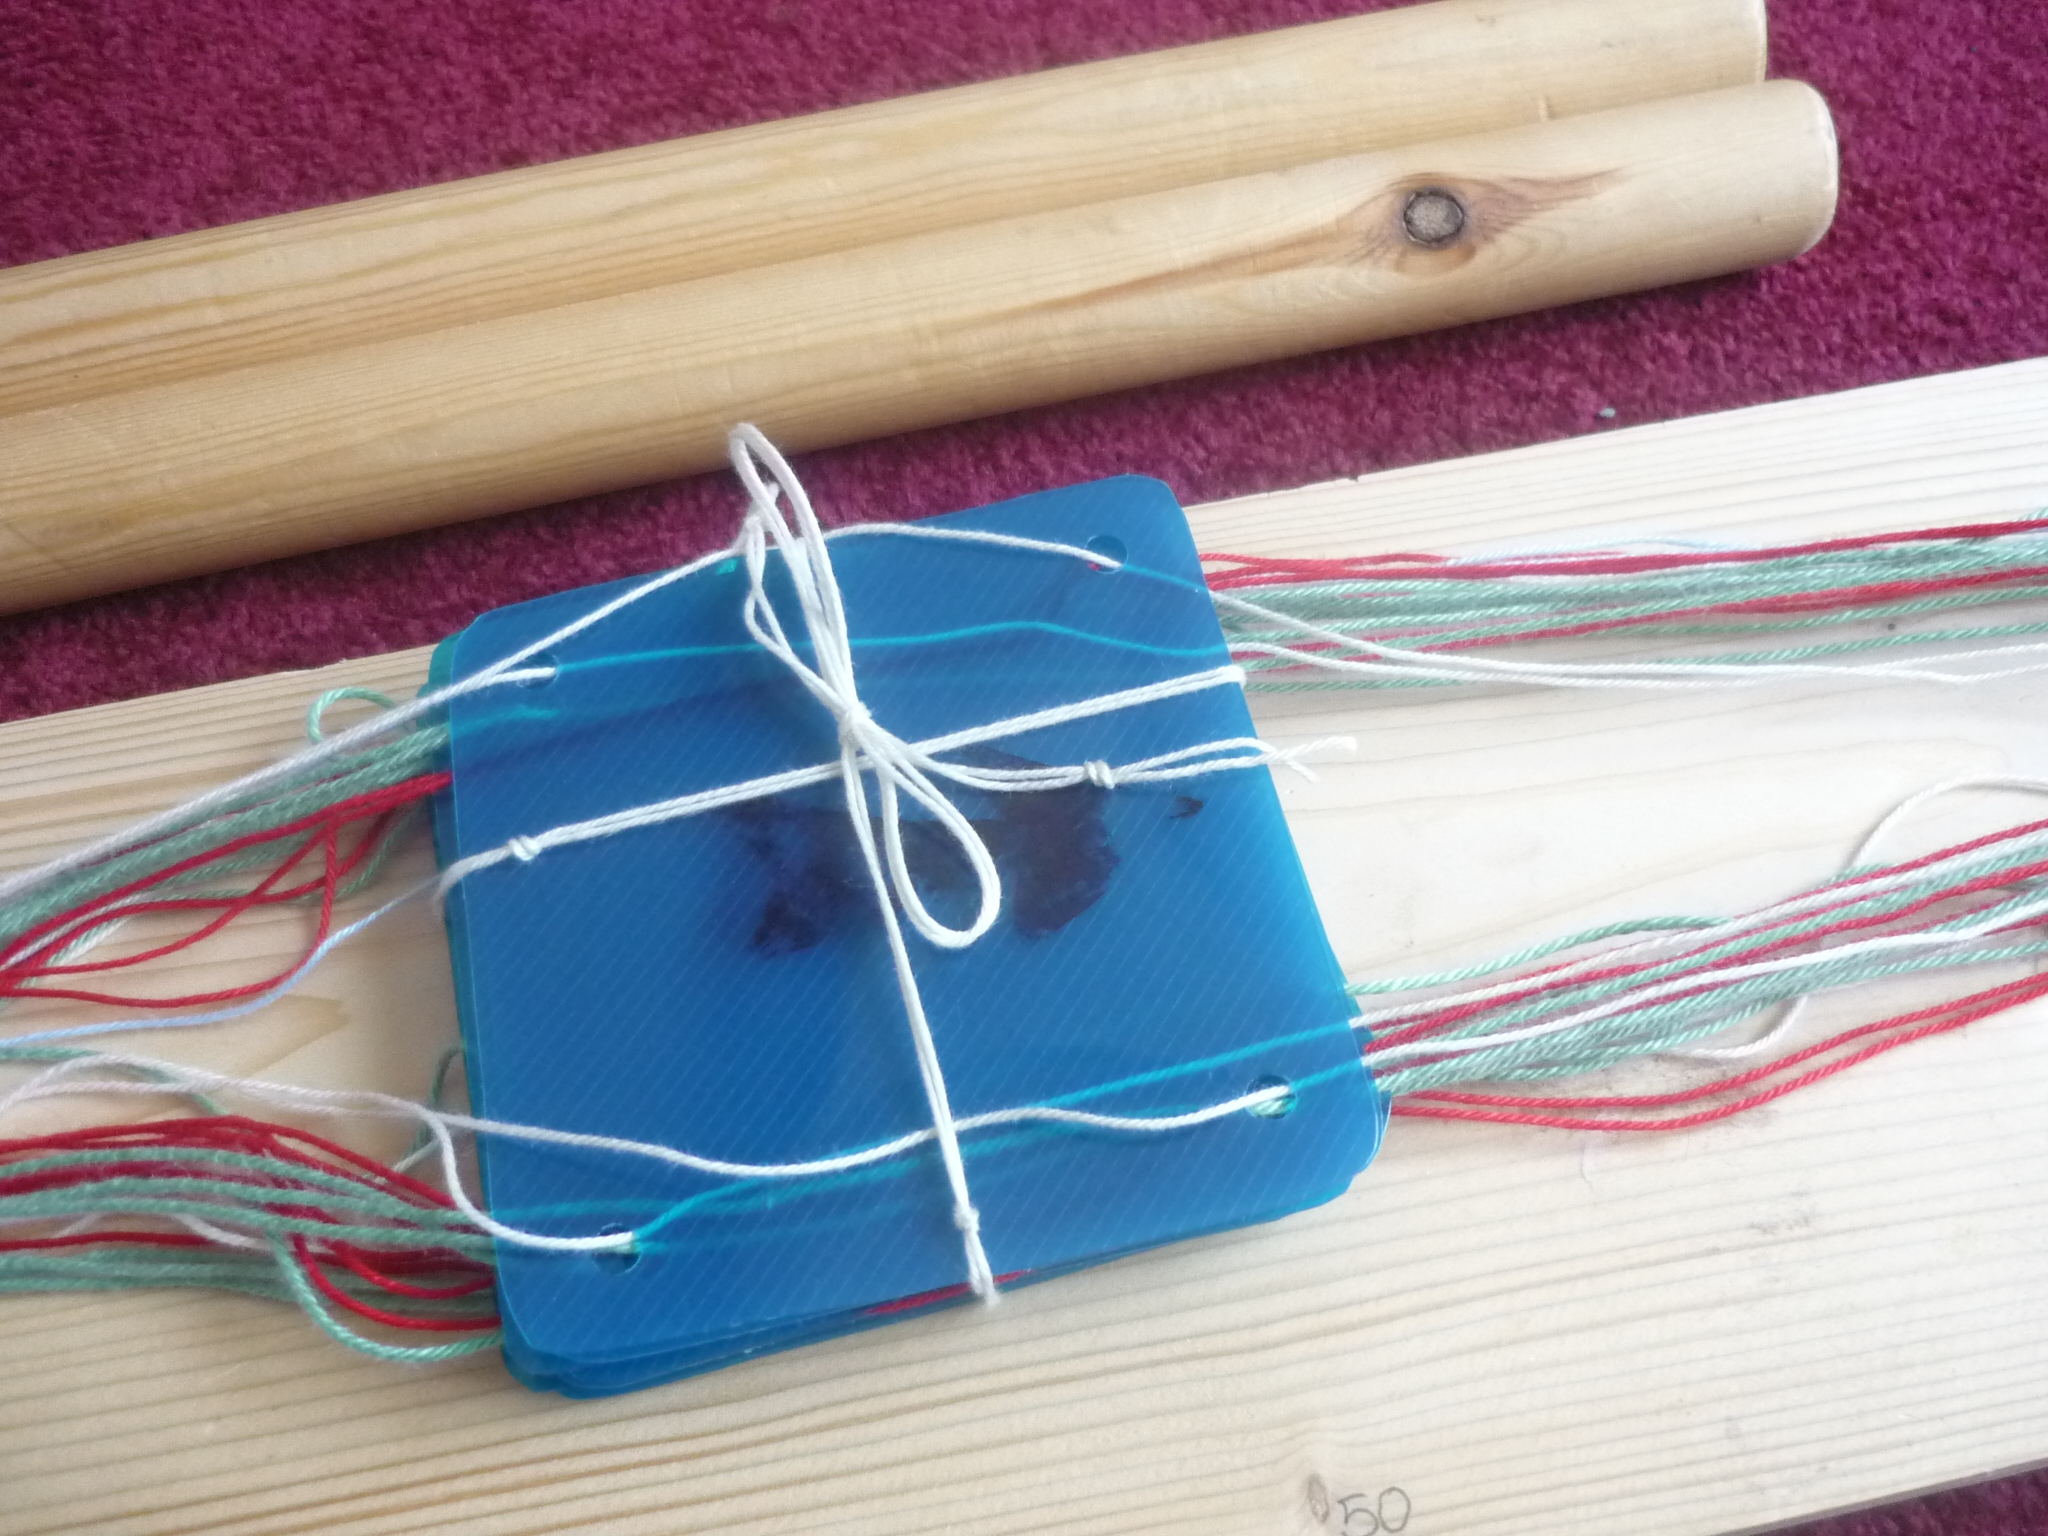
Once all the tablets are threaded up in the correct threads and stacked in order I loosely tie the stack of tablets together.
At the opposite end of the frame I now have a big tangle of all the excess warp thread.
This needs to be carefully teased out in order and wrapped securely around one of the poles which is then securely tucked under the arms of wood protruding from the end of the frame to add tension to the warp threads.
I then untie the binding around the tablets and attach the ball of weft thread onto the ring at the top.
The weft thread is passed through the shed that has formed when the tablets are square.
The tablets are then all rotated 90° clockwise. The warp thread is passed back and the tablets are rotated 90° clockwise again.
Once this has been done 4 times half of the diamond should have been woven (the chevron shape as on the diagram.)
To complete the diamond shape the weaving continues with the weft thread passing back and forth through the warp threads but now the tablets are turned anti-clock wise four times. This will now create the complete diamond shape.
If at any point the weaving is left the tablets can be re-tied together to prevent tangling.
As the braid grows it will be necessary to move the work along the frame to maintain a large working area. To do this the unwoven ends of the warp threads are unwound from the end pole and the woven braid is wound onto the other end of the frame.
For transportation the tablets are bound together and then the frame is wrapped up securely in a custom-made cover to protect the weaving and components.
For authentic situations the plastic tablets can be replaced with wooden (bone or hardened leather would also be suitable) The portability of this frame and set up means that it is possible for me to weave in all sorts of locations.
Using this frame I have woven many different colour combinations and patterns including this 9m section (part of a commission for a Viking display in Barrow Dock Museum)
I have also tried various patterns including this specially commissioned “rainbow” which incorporated diamonds, chevrons and crosses.
For this I turned the tablets 12 turns clockwise followed by 12 turns anti-clockwise.
Tablet weaving can be a lot of fun! I am hoping to try different patterns in the future including a rams horn pattern.
If you would like any more information about tablet weaving please contact me via rachel@pixiecreations.co.uk
As a fabric upcycler I am often given old clothing to use. One of the most frequent items of clothing I receive is a pair of old/worn jeans.
There are many different ways to upcycle a pair of jeans. I wanted to maximise the use of just one pair, using as much of the fabric as possible and retaining the look of the jeans.
My initial idea was to use the seat of the trousers to make a bag, retaining the front and back pockets and using the front button in the bag closure.
To do this I carefully cut off the legs and straightened the area around the crotch of the jeans. I then used the basic shape to cut out lining fabric (I have lots of off-cuts of fabric and various old curtains/bedlinen etc..) I sewed the side seams of the lining together on the machine.
To shape the bottom of the bag I gathered both the denim fabric and the lining fabric to make the bag have more of a 3D shape at the base. I then sewed the bottom seams up and tacked them together to help with the final assembly.
I then moved on to making the straps for the bag by cutting strips from the legs and folding the raw edges in, these were sewn up by hand using blanket stitch.
I also made a small loop to close the bag at the front and sewed up the fly to prevent the zip from unfastening.
I then pinned all the pieces in place, tucking the raw ends of the straps and the loop in between the lining and the outer of the bag.
I carefully hand-sewed blanket stitch around the top of the bag sealing all the parts together. This completed the bag.
Here are some of the samples I made whilst developing the design:
I then looked at the rest of the denim left over from the pair of jeans.
I was left with two complete leg panels and some off-cuts from the rest of the making process.
This included the side seams from the legs which I carefully cut off and using plenty of PVA glue I coiled the seams up together to make a coaster:
From the remaining fabric I made a hairband but making a flower by gathering one strip of fabric and then making the band from another strip of fabric which I hand-stitched the edges of. I added some elastic to make it fit.
I also made a “Beastie” (along the lines of the crochet beasties I had made previously) which I stuffed with all the tiny off cuts that were too small to do anything else with.
I was then left with a few long thin strips of denim fabric which I plaited together and tied off to make very simple raw bracelets
Apart from a few remaining scraps I had now used all of the denim fabric from a single pair of jeans and upcycled it into new, unusual and unique items.
Many of the fabric bags are still available to purchase.
I am also available to come and teach you how to upcycle like this…
Please contact me on rachel@pixiecreations.co.uk for more details


 This is the basic body shape I use when making mini-mes, however I adapt the sizing to suit the person (eg. fatter/thinner body shape, longer torso/legs/arms for a taller person etc.)


