Sewing

All posts tagged Sewing

Upcycling Old Jumpers

Published March 9, 2016 by rachelpixiecreations

Many of us have, at some point, ended up with a jumper that is no longer useful. Either it will have worn out or been ruined through washing etc.

There are numerous ideas and projects that can be done to repurpose, upcycle or adapt the jumper into something unique, useful, new and even stylish!

Old jumpers are also easily accessible via donations from friends and family or by raiding the rails at the local charity shop (unless I am looking for something specific I rarely spend more than £1 on a jumper!)

I find that the jumpers acquired often dictate the project as different fibres lend themselves to different ways of working with them.

For example if I want to work with felted fabric I will need to select 100% wool fabrics and boil wash them in order to create the suitable material (of course this washing procedure may be what prompts the need to re-purpose the jumper in the first place!) Felting woollen jumpers can be a bit hit-and-miss as some woollen jumpers have been specifically treated to prevent them being unintentionally shrunken in the wash. However many will shrink.

The beauty of working with felted jumpers is that they require little or no  hemming etc. as the fibres will not unravel due to the felting procedure. The fabric can often be used in the same projects that regular felt would be used and as such many decorative projects can result from these. The material may still retain some of its flexibility, however, and can be made into extra warm clothing: outerwear, hats and shoes etc.

Cotton knit jumpers tend to be the most likely to unravel when cut due to the smoothness of the fibres. As such it is important that the cutting stage is done as closely to the sewing stage as possible. Cotton knit is great for repurposing into clothing as it has a good structure and is less likely to misshape. It is also good at retaining body heat in the colder months as well as keeping cool in the summer.

Acrylic knits are, by far, the easiest fabric types to get hold of. They are often the jumpers relegated to the special offer rails in the charity shops. They should not be discredited however as they are likely to be the best source of colour and pattern into any project. Any seams and hems will need to be carefully sealed in the creation process to prevent unraveling of the fabric.

When cutting and sewing old jumpers there are a number of ways to seal the seams and hems.

The most common way involves using an overlocker or serger which will sew and bind the edges of the fabric at the same time. These are becoming more econimic to buy and can cost little more than a sewing machine. Another way to seal in any raw edges is to sew all the seams as “french seams” as explained in the following diagram:

Another seam type which would seal in the raw edges is a felled seam, however this may be trickier to do as the knit fabrics are harder to press flat:

Raw edges can also be sewn in by hand which although takes time may actually be easier!

When upcycling and repurposing old jumpers it is important to experiment and have fun and remember every item you make is unique!


Tree Wallhanging

Published December 3, 2014 by rachelpixiecreations

One of our creative projects has included a fabric Wall-hanging of a tree.

tree 2

This is made from a brown patterned piece of fabric (approximately 4 foot wide by 6 foot high) The fabric was hemmed around all four edges with a large channel sewn into the top which houses a long branch of willow wood. The purpose of which is to hold the image flat and square.

Onto this was sewn a hand-cut appliqué  of the outline of a tree. This was cut from cream fabric and after using fuseable interfacing to hold the image in place it was carefully sewn down by hand using small blanket stitches also in creamtree 5

Once this was complete detail and texture was added using beads, sequins and other small trinkets. In the high branches a cobweb was made using small crystalline beads.

tree 1

Strings of beads were sewn slung between the branches and larger pendants hung in the branches.

tree 3

Around the edge of the tree and its decorations small silver and holographic star sequins were sewn in place to add detail.

tree 6

The completed hangin is displayed in a wall by resting each end of the wooden pole on a carefully positioned nail in the wall. It looks wonderful and sparkly in the winter sunshine!

Commemorating WW1 with the Poppy Appeal and Hilary’s Blinds Country Crafts Competition

Published March 29, 2014 by rachelpixiecreations

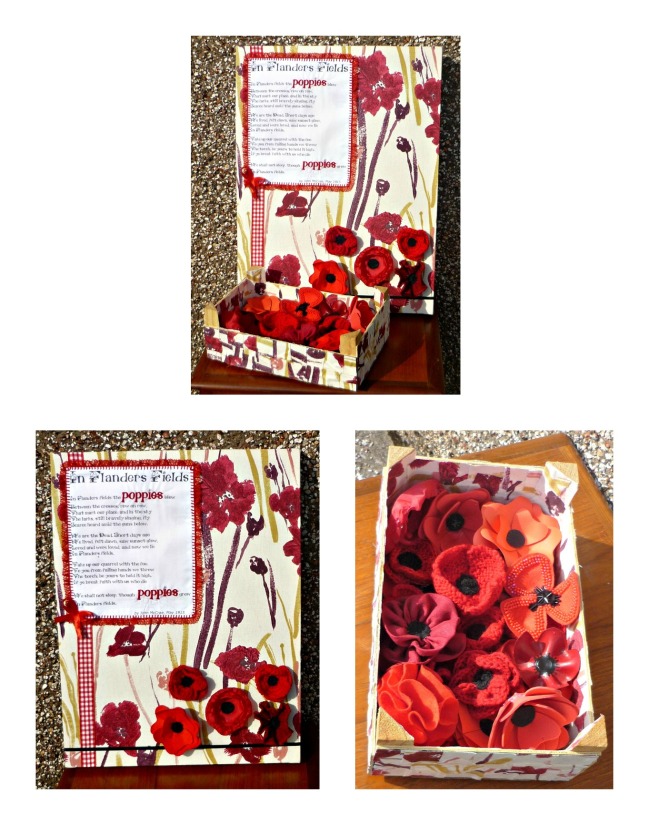
I have been working on a special creation using fabric from Hilary’s Blinds to commemorate 100 years since the outbreak of world war one.

Hilary’s Blinds Country Crafts Competition offered a square metre of one of a choice of four fabrics to be turned into an amazing creation.

I chose to select Wild Poppies Vermillion as I wanted to combine this creation with Pixie Creations involvement in the Poppy Appeal.Image


I wanted to create a picture/wall hanging. I decided that I would stretch the fabric on a wooden frame to emulate an artists canvas. To do this I first had to make the wooden frame. I cut the wood to length and securely screwed it together to make a rectangular frame.Image


I used drawing pins to stretch the “Wild Poppy Vermillion” fabric over the frame and pin it taught in place.Image


I then started to work on the additional decoration to add to the front of the piece. I wanted to put the poem “In Flanders Fields” onto the front as a focus. To do this I first typed and edited the poem into the computer and formatted it using an appropriate font choice and size. I printed this in reverse onto iron-on t-shirt printing paper.

Next I carefully ironed the poem onto a piece of plain white cotton which reverted the image to the correct orientation. This took some time as I wanted to ensure that the text was securely attached to the fabric.Image


Then I cut the white fabric with applied poem into a rectangle around the text. I wanted to highlight the word “poppies” where it appears twice in the writing so I embroidered over the writing in red and then added a red border to the fabric in blanket stitch. ImageAfter that I needed to attach the poem onto the stretched fabric. To do this I carefully hand stitched around the edge using a coordinating white cotton to camouflage the sewing.

Image


I also added a red lace border to the text as well as some ribbon trim. To finish the picture/wall hanging I sewed on a selection of the poppies I had made as samples for the Pixie Creations Poppy Appeal (to raise money for the Royal British Legion) Examples of the various poppies I have made so far can be seen here.

I still had some of the Wild Poppies Vermillion fabric left which I cut up and glued onto one of the boxes I have for displaying and storing the poppies.

Image


I completed the creation by arranging the poppies in the decorated box.Image

Upcycling Suede Jacket Project

Published February 26, 2014 by rachelpixiecreations

Initially this project started with finding a simple suede jacket.

Image

I wanted to improve the look to create something unique and lavish.

I have a large selection of fabrics and trimmings to use so starting with the base colour of the suede I gathered a collection of fabrics together.

Image

I decided to create a large patchwork skirt to sew onto the bottom of the jacket to add length and make it much more coat-like.

To do this I needed to cut out a template for the skirt from paper (this involved a large amount of geometry!)

I then cut the fabric into rough quadrilaterals and laid them out on the pattern balancing the coloured and patterned fabrics.

Image

The patches then needed sewing together. Initially I tried pinning them but this caused the patches to ruffle and not lie flat. So I improvised and used masking-tape to hold the patches together while I sewed them.

Image

After sewing the seams needed reinforcing. On the front I sewed various pieces of vintage lace, ribbon, braid and other trimmings.Image

Then I needed to reinforce the back of the seams. I had some bias-binding but it was very bright white. So I toned it down by staining it with tea and then sewed it over the seam joins on the back of the skirt.

Image

Next I made some cuffs for the jacket. I made the crochet lace for these in cream and dusky purple and then gathered them around the wrists of the sleeves and hand stitched them on. This was when I realised that a suede jacket would not make this project easy as I had to hand-sew everything to the suede as it would not go through my sewing machine!

Image

After that I sewed the skirt around the bottom edge and added some more lace to help blend the skirt into the jacket.

Image

I then moved on to embellishing and adding detail to the jacket. I covered the collar with red Chinese brocade and added more crochet lace. I also made a faux corset back from more Chinese brocade with metal rings and ribbon. I covered the pocket flaps with fabric shot with gold thread and trimmed them with red lace.Image

I then made some lace-trimmed fabric patches onto which I embroidered various motifs to further embellish the coat.

Image

Final trimming involved lining the lapels with purple fabric and trimming the front edges with more lace as well as hemming and trimming the bottom of the skirt section.

Image

Here are some pictures of the finished coat:

Image

Image

Image